

[ad_1]
Picture masking is likely one of the most essential functionalities of any picture modifying program. Regardless that picture masking implementation can range from {photograph} to program, the idea behind the picture masks is identical. Picture masks enable us to make use of selective modifying.
Let me clarify.
When analyzing any picture, you’ll be able to see that totally different areas have distinct traits and properties. It’s unlikely to use a sequence of edits to a whole picture and obtain the specified outcomes. The one technique to produce professionally-looking photographs is to edit totally different areas of the picture individually utilizing varied instruments and strategies.
That is when picture masking comes into play.
Picture masing helps us isolate (masks) particular areas of the picture and go away unmasked areas obtainable for modifying.
What’s Picture Masking?
Picture masking is an important approach in graphic design and picture modifying, important for duties like compositing and selective modifying. It lets designers and photographers edit solely sure elements of a picture whereas maintaining the remaining unchanged. Customized picture masks assist goal particular areas in images primarily based on parameters like shade, brightness, and objects or options comparable to individuals, animals, merchandise, sky, or water.
Picture masking has its roots in movie pictures. Within the darkroom, photographers used to cowl a part of the picture paper, the one they didn’t need to be affected by the sunshine coming from the enlarger. The method of concealing the world of the picture paper known as masking.
The idea of masking transitioned to digital pictures, however as a substitute of bodily masks, we use digital instruments to guard (masks) or reveal a part of the picture for selective modifying.

Picture Masking in Lightroom
When Lightroom was launched in 2007, it didn’t have any picture masking capabilities. The first perform of this system was picture group. You could possibly apply easy edits comparable to publicity, saturation to the whole picture solely; selective modifying didn’t exist. To make use of selective modifying with the assistance of picture masks, you needed to swap to Photoshop.
Through the years, Adobe launched selective modifying to Lightroom (Adjustment Brush, Graduated Filter, Radial Filter), nevertheless it was not even near Photoshop’s masking capabilities.
The primary huge change occurred in 2018 with the introduction of the superior masking instruments, the Vary Masks. With new masking instruments, photographers may selectively goal areas of the picture primarily based on shade and luminance values. It was big. It modified the best way I edited images in Lightroom. It allowed me to carry out 90-95% post-processing in Lightroom, and the necessity for Photoshop declined.
However the implementation of the Vary Masks was not best. It had too many limitations. You could possibly not create a picture masks from scratch; you needed to apply Adjustment Brush, Graduated Filter, or Radial Filter first and create masking after.
And at last, in October 2021, Adobe launched Lightroom model 11, the place they rebuilt and rearranged adjustment instruments. Essentially the most important change was the introduction of a devoted Masking panel. Now, all of the masking instruments reside in a single place, not depending on any specific instrument.

The modifying workflow is easy now. You create a number of picture masks concentrating on totally different picture areas first. Subsequent, you selectively edit these areas utilizing modifying sliders.

Kinds of Picture Masking in Lightroom
All masking in Lightroom is a non-destructive course of. It signifies that you by no means modify the unique picture, you at all times work on a JPEG preview.
For me picture masking is likely one of the most essential features of Lightroom, I exploit it with each picture I edit.
Let’s see what picture masking instruments we’ve got in Lightroom right now.
1. AI Picture Masking: Choose Topic
Adobe at all times lagged behind the competitors, comparable to Luminar, with the event instruments powered by synthetic intelligence (AI). But it surely seems to be as whether it is beginning to change.
Lightroom launched two new AI instruments, and they’re very efficient.
To masks a picture you merely press the button and the Choose Topic AI instrument analyzes the picture and identifies the principle topic; subsequent, it routinely creates a reasonably correct masks.
It’s broadly used for eradicating the background.

It’s the good companion for portrait and product photographers.
Additionally they launched a brand new function, the Invert Masks, essential for any picture masking instrument. After the principle object is chosen, you invert the masks and goal the background of your picture with modifying instruments.
2. AI Picture Masking: Choose Sky
The Choose Sky performance is just like the Choose Topic, however as a substitute of the principle object, it identifies the world of the sky and creates a masks.

When that you must masks a sky, you press the button and the AI Choose Sky instrument does the remaining.
The Choose Sky instrument works quick, and it is vitally correct. It’s a lot quicker and extra correct than utilizing the old-school method concentrating on the sky with the Brush or Linear Gradient instruments.
As soon as once more, you’ll be able to invert the masks.
Right here is my workflow when utilizing new masking instruments. I click on the Choose Sky instrument, and it routinely creates a picture masks with the sky chosen. Subsequent, I duplicate the masks and invert the choice. Now, I can edit the world of the sky and foreground individually.
Priceless.

It’s evident that the Choose Sky instrument is the right companion for panorama photographers.
The one adverse I see with the Choose Sky instrument is it can’t be used dynamically. I can’t reserve it as a Lightroom preset to generate a picture masks in any chosen picture dynamically.
I hope Adobe improves the performance of the Choose Sky sooner or later.
3. Brush Picture Masks
The outdated Brush Adjustment instrument is now referred to as the Brush. It reworked from an adjustment instrument to a pure masking instrument.
Let me clarify.
When utilizing outdated Brush Adjustment, you may transfer modifying sliders first after which begin portray with the comb over the picture, visually making use of selective edits. With the brand new Brush instrument, you at all times begin with the masks creation. And solely if you find yourself proud of the masks, you start transferring sliders making use of desired results to the remoted space.
With the introduction of the Choose Object and Choose Sky AI instruments, the first perform of the Brush instrument in my modifying workflow is masks refining. If I’m not absolutely proud of the masks created by the Choose Object and Choose Sky instruments, I can fine-tune them with the Brush.

4. Linear Gradient Picture Masks
The Linear Gradient is a brand new title for the outdated Graduated Filter instrument. The instrument transformation is just like the Brush instrument. From the adjustment, it reworked right into a pure masking instrument.
Now, I usually mix the Choose Sky with the Linear Gradient concentrating on space of the sky and making the highest of the sky darker.

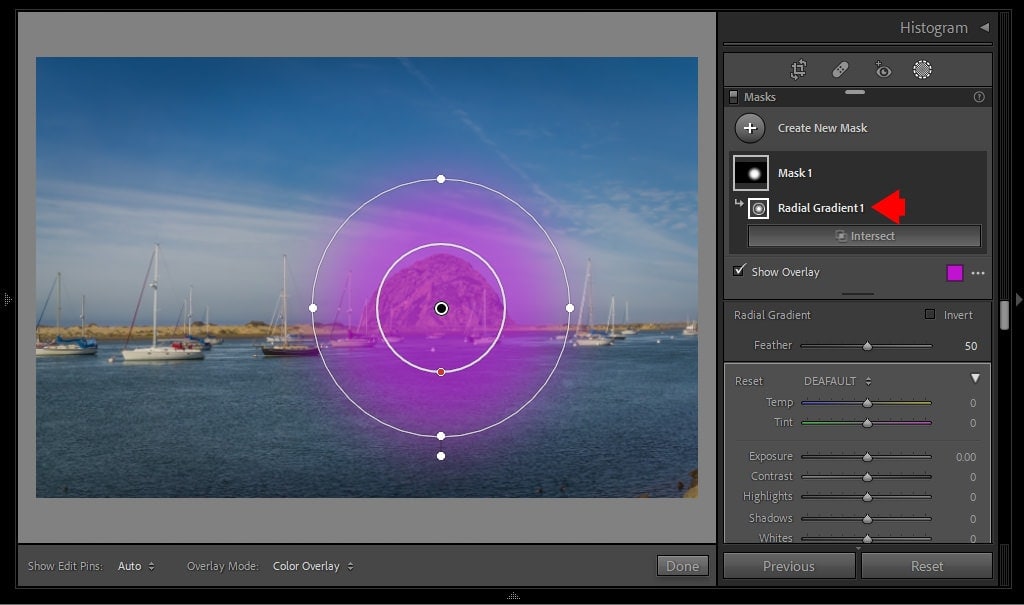
5. Radial Gradient Picture Masks
The Radial Gradient follows the suite of the Brush and Linear Gradient instruments. It has a brand new title; it’s Radial Gradient now as a substitute of Radial Filter. And it carries masking performance now.
However the best way you utilize it is vitally just like the earlier model. The one distinction right here is as a substitute of 1 circle that signifies the chosen space, there are two. The interior circle signifies the place the opaque space ends, and the gradient begins.
6. Coloration Vary Picture Masks
The Coloration Vary masking instrument helps you create masks primarily based on particular shade values or vary of colours.
Regardless that I usually used the unique Vary Masks, it had too many limitations. First, it was hooked up to Brush, Linear Gradient, or Radial Gradient instruments, and also you solely may modify the masks created by these instruments. After all, I had workarounds, nevertheless it felt as if implementation wasn’t well-thought.
Now, nearly all limitations are gone. Each the Coloration Vary and Luminance Vary are separated and never depending on any instruments.
Enormous enchancment.

I usually use the Coloration Vary masks when modifying the sky space in my landscapes. I goal solely the blue hues of the sky and preserve vivid areas of the clouds protected. And if I edit the sundown picture, I’d create a separate Coloration masks concentrating on solely orange and crimson hues of the sky.

However, it has the identical limitation because the Choose Sky picture masks; you’ll be able to’t use it dynamically. Not less than at this second, it’s not possible to include the Coloration Vary masks creation into Lightroom presets. It solely works with the particular picture.
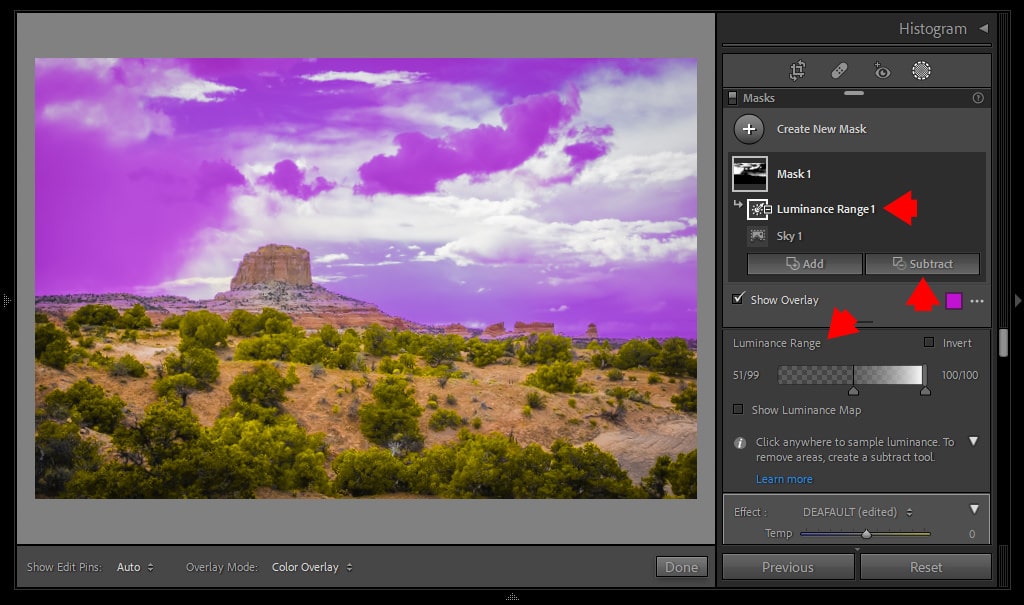
7. Luminance Vary Picture Masks
If the Coloration Vary instrument helps you to create a customized masks primarily based on the colour values, then the Luminance Vary instrument generates masks primarily based on the brightness (luminance) of the pixels.
The brand new Luminance Vary masking instrument is my favourite addition to the masking toolset. I exploit it most frequently together with the Choose Sky AI instrument.
For instance, I exploit the Choose Sky instrument with the Invert possibility checked to pick every thing besides the sky. Subsequent, I exploit the Luminance Vary to focus on the midtone pixels solely. Now, I can enhance the distinction with out affecting shadows, highlights, and the sky.

And what’s the most vital function of the brand new Luminance Vary instrument is it may be used dynamically. I already created a set of distinction presets concentrating on midtone values solely. After I apply the preset to any chosen picture, Lightroom creates a picture masks on the fly primarily based on the luminance values of the chosen picture.
8. Depth Vary
Adobe launched the Depth Vary instrument some time in the past, however I used to be essential due to its very restricted use. It solely works with the brand new HEIC format, Apple’s proprietary model of Excessive-Effectivity Picture File format.
The Depth Vary instrument creates a picture masks primarily based on how shut the a part of the picture to the digital camera. In concept, it’s a nice function that permits you to selectively edit solely the background space of the picture and preserve areas near the digital camera untouched.
The issue is that HEIC photographs with the depth map may be produced solely utilizing the iPhones with the twin digital camera beginning with iPhone 7+.
Since I’m an Android consumer, I’ve no use for this instrument. However even if in case you have a brand new model of iPhone, you get higher picture high quality when taking pictures RAW format (DNG) than HEIC.
9. Superior Masking in Lightroom
With the introduction of eight new picture masking instruments, you may have loads of choices for creating exact and complicated masks for selective modifying. However you’ll be able to take it even additional with the brand new Add and Subtract options.
Now you’ll be able to mix all of the masking instruments making selective modifying much more versatile.
Here’s a sensible software of the Subtract function.
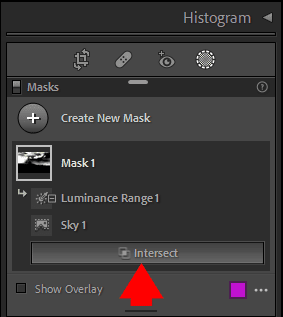
To selectively edit the sky space, I exploit the Choose Sky instrument first. When Lightroom creates the masks, I hit the Subtract button. Subsequent, I decide the Luminance Vary instrument and subtract the highlights from the prevailing masks created by the Choose Sky instrument. When I’m carried out, I’ve the choice concentrating on solely darker areas of the sky. I can selectively edit the sky with out affecting the brilliant clouds.
The chosen space of the picture is highlighted in pink (you’ll be able to change the colour).
The Add function masks works the identical means, however you increase the masks as a substitute of subtracting a portion of it. For instance, you need to use the Brush instrument to increase the masks by portray over desired areas of the picture.
Plus, there’s one other masking function I nearly missed. It’s the Intersect possibility. You allow it when urgent down the ALT key. It helps you to create a masking choice by intersecting 2 masks.
The Shortcomings of Lightroom Masking Instruments
I want that Adobe made the Choose Sky and the Coloration Vary instruments absolutely dynamic, as I discussed above. However I consider it’s a work in progress, and within the close to future, they may enhance the performance of the masking instruments. I’ll replace my Lightroom Fast Modifying system after they do it by incorporating all of the masking instruments in my preset-based picture modifying workflow. It can enable me to edit images a lot quicker and with larger precision.
In Lightroom, you’ll be able to solely edit one picture at a time. There is no such thing as a performance to create a composite or collage.
However the principle shortcoming of the brand new masking instruments, the best way I see it, is that after creating the specified masks, I wouldn’t have entry to all of the modifying instruments obtainable in Lightroom.

For instance, my favourite Lightroom modifying instruments are positioned in HSL/Coloration panel. They permit me to focus on particular person colours selectively. I wouldn’t have entry to the HSL/Coloration panel with the brand new masking instruments. The identical goes with the Tone Curve and Coloration Grading panels; they’re unavailable when utilizing the masking performance.
It seems to be as if Adobe arbitrarily determined what instruments I would like and instruments I don’t. The difficulty wouldn’t exist if Adobe used the layer-based method because it exists in most modifying applications, together with Photoshop. However, for some inexplicable purpose, they refuse to present us layers in Lightroom, the principle function that made Photoshop so highly effective.
Picture Masking in Adobe Photoshop
I transitioned to pictures from graphic design. For years, I used Photoshop as my major modifying and compositing instrument as a graphic designer. And what I realized from my graphic design years is that to grasp Photoshop, you must grasp learn how to create exact alternatives and masks.
Photoshop has a way more in depth choice of masking instruments and is way more highly effective in comparison with Lightroom.
This text goals to not educate you to make use of masking instruments in Photoshop as a result of it’s not possible. However as a substitute to present you an thought of masking choices obtainable in Photoshop. So you’ll be able to determine if that you must be taught Photoshop or Lightroom picture masking instruments will likely be adequate.
1. Layer Masks
Photoshop is a layer-based program with an nearly limitless variety of layers. And for every layer, you’ll be able to have a devoted transparency masks.
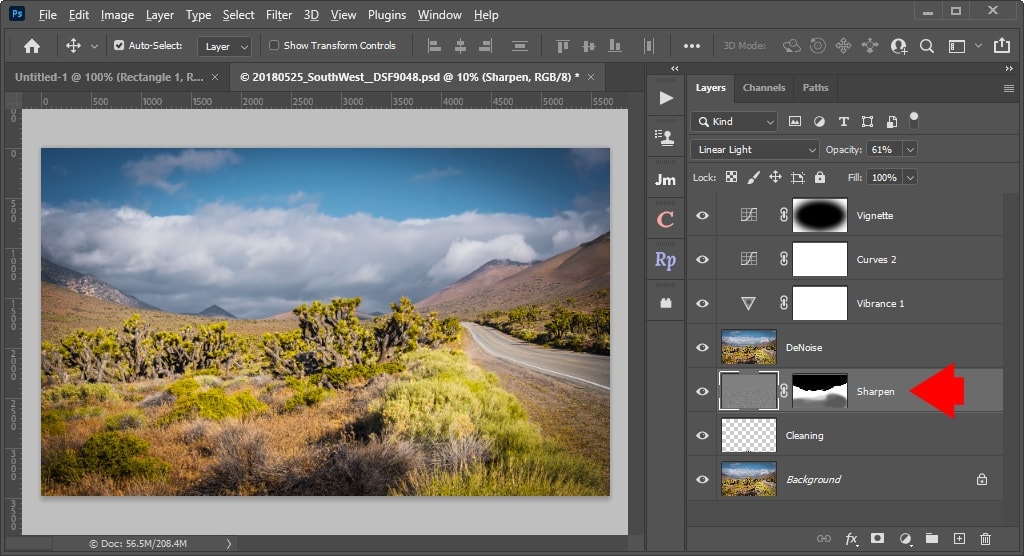
If you create a layer masks in Photoshop, you make a part of the layer invisible.
Lightroom doesn’t have layers, however you’ll be able to have a number of masks hooked up to any picture you edit.
2. Vector Layer Masks
The vector layer masking performance permits you to create resolution-independent masks in Photoshop. This function doesn’t exist in Lightroom, however it’s not often utilized in picture modifying.
I solely used vector layer masks when working with high-resolution photographs meant for print. I by no means felt the necessity for vector masks in my pictures.
3. Adjustment Masks
Adjustment layers are nondestructive edits you’ll be able to apply to any layer in Photoshop. And for every adjustment layer, you may have a transparency masks. Authentic adjustment instruments in Lightroom (brush, graduate filter, radial filter) labored exactly as adjustment layers in Photoshop. With the newest revamping of masking instruments in Lightroom, they work barely totally different however nonetheless similar to adjustment layers and masks in Photoshop.

4. Clipping Masks
Clipping masks in Photoshop allow you to management transparency masks in a single layer primarily based on the content material of one other layer. The performance is broadly utilized in graphic design and picture compositing. Such a function will not be doable in Lightroom as a result of it has no layers. However you gained’t miss it if you’re solely thinking about picture modifying.
5. Alpha Masks
Alpha Masks is a complicated kind of masks and a really highly effective choice instrument in Photoshop. The masking data is saved in one of many picture’s shade channels (alpha channel) and may be accessed by varied applications outdoors of Photoshop.

After I was working as a graphic designer producing graphics for broadcast tv, 80% of my time was spent creating refined alpha masks in Photoshop. It allowed overlaying a number of photographs on a TV display screen, preserving transparency in several elements of a picture.
Regardless that it’s a highly effective function, you don’t miss it when processing images. And there’s no such a function in Lightroom
6. Choose Sky
The Choose Sky instrument is powered by synthetic intelligence and machine studying. It detects and selects the sky space with precision and accuracy. I’m sure the instrument makes use of the identical algorithm because the Choose Sky instrument in Lightroom. Each instruments produce related outcomes.

7. Choose Object
The identical goes with the Choose-Object instrument, which is powered by AI and similar to the way it works to the Choose Object instrument in Lightroom.
8. Coloration Vary
The Coloration Vary is a really helpful methodology of masking. You may create customized masks primarily based on a particular shade or vary of colours in any given picture. For a very long time, I missed such performance in Lightroom. Nevertheless since Adobe launched the Coloration Vary in Lightroom in model 8, the necessity for Photoshop shade masking capabilities disappeared.
9. Luminosity Masks
I consider the implementation of Luminance Vary in Lightroom is extra user-friendly and logical than Photoshop’s Luminosity Masks. In Lightroom, you’ll be able to create a customized masks primarily based on luminance (brightness) values in seconds. In Photoshop, it’s extra highly effective however way more sophisticated. Keep on with Lightroom.

As you’ll be able to see, regardless that Photoshop is a way more highly effective and feature-rich program, the necessity for Photoshop in picture modifying diminishes quick. And on the subject of picture masking functionalities, I don’t see an enormous benefit of Photoshop over Lightroom.
Plus, to completely make the most of Photoshop superior options, that you must rasterize photographs first. In Lightroom, you’ll be able to keep in a RAW modifying atmosphere profiting from nondestructive modifying.
Picture Masking in Picture Modifying: Conclusion
I’ve been expressing considerations about Adobe’s lack of actual innovation in Lightroom over the previous few years, feeling that many rivals had been forward. Nevertheless, with the introduction of latest picture masking instruments, there’s hope that Adobe has lastly acknowledged the necessity for innovation. This implies that picture masking can assist deliver really modern instruments and options to Lightroom.
Articles Associated to “Picture Masking: Important Device for Picture Modifying with Photoshop and Lightroom“
[ad_2]