Whether you’re shooting in RAW or JPEG, Lightroom provides powerful tools to help you convert your photos to the format that best suits your needs. In this article, I’ll show you how to convert RAW to JPEG in Lightroom in just a few simple steps.
By now, every photographer knows that to maximize image quality, dynamic range, and color accuracy, you need to set your camera to RAW image format and stick with it.
It is also evident when you import your new images to Lightroom; you keep them in the original RAW format. And only after performing all necessary editing steps, at the very end of the photo editing workflow, do you convert RAW files to JPEG for publishing.
To convert RAW to Jpeg in Lightroom, select the image in Libray or Develop Module, right-click on it (Option Click on Mac) and choose the Export option from the menu. In the export settings window, set image format to JPEG, and for quality, choose 100% to maximize image quality or set quality to 80% for web publishing.
Nondestructive Editing and RAW to JPEG Conversion
If we want to be completely accurate, there is no way to convert RAW to JPEG in Lightroom.
Let me explain.
Lightroom uses nondestructive editing when dealing with RAW files. It means that the original file always stays intact and is never modified by the program.
For example, moving editing sliders in Develop Module do not change the original RAW file. Instead, Lightroom writes all editing steps to the sidecar file in XML format. And for the preview, Lightroom generates a JPEG image by reading and applying editing values from the sidecar file. The original RAW file always stays untouched.
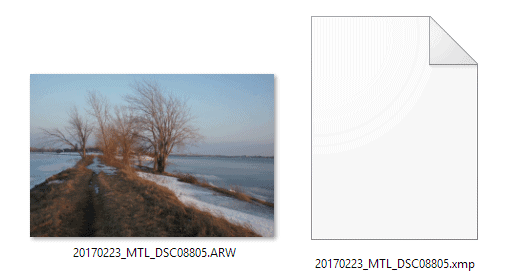

When we say “converting RAW to JPEG,” it means that Lightroom creates a new version of the edited image in JPEG format. You end up with 2 image files, one original RAW file and another in JPEG format, with all edits applied.
How To Convert RAW To JPEG In Lightroom
1. Select the RAW Image Intended for JPEG Conversion
Before converting RAW to JPEG, select the RAW image you plan to convert.
You can initiate RAW to JPEG conversion in both Library and Develop Modules of Lightroom.
You can select any RAW file in Lightroom by simply clicking on it. The highlight around the image is a confirmation that it is selected.


2. Activate the Export Module
Right-click (Option-click) on the selected RAW file and choose the Export option from the menu.


Ultimately, you can initiate the export process by going to the Main Top Menu and selecting the ‘Export…’ option. Or you can use the keyboard shortcut Ctrl+Shift+E.
I always use the “right click” option while converting RAW files to JPEG. I find it more convenient. But it is a personal preference.
3. Set the Conversion Format to JPEG
Clicking the Export option (step 2) will activate the Export Setting Window.
First, you need to select the export image format under the File Settings panel.
- Image Format: from the drop-down menu, select the JPEG option
- Color Space: select the sRGB option.
- Quality: for image quality, move the slider all the way to 100%. It tells Lightroom to save the JPEG image in the best possible quality.
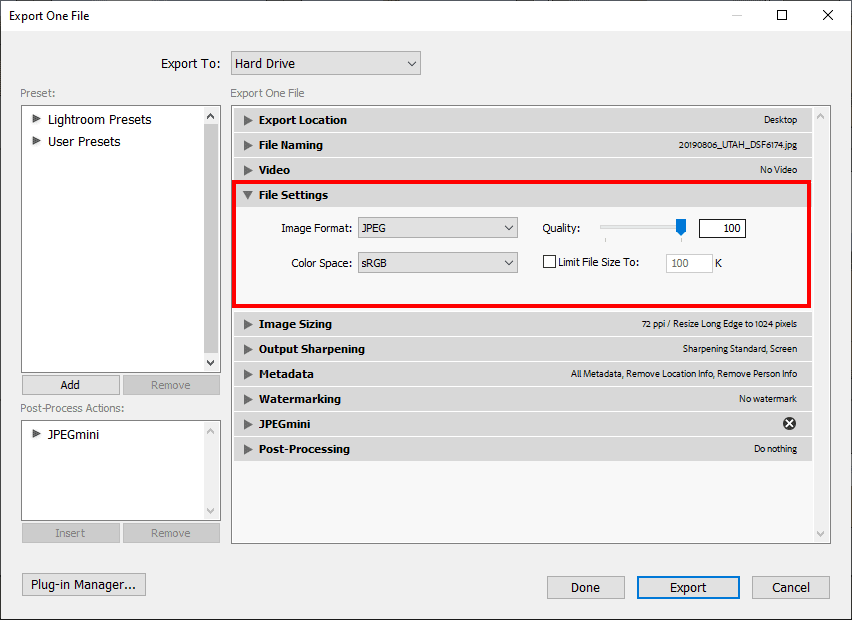

Saving the JPEG image at 100% quality is ideal when you need your JPEG image for archiving or printing purposes.
If you want to learn what setting to use to save JPEG images for the purpose of web publishing, check my dedicated tutorial here: Lightroom Export Settings for Web, Print, Facebook…
4. Specify the Destination for the Converted JPEG Image
Lightroom offers plenty of options where to store converted JPEG images. In our case, we will save the final image to the local folder of the computer’s hard drive.
First, select the Hard Drive option from the ‘Export To’ top menu. It indicates that you want to save the exported file to the local hard drive.
Next, from the Export Location section, select the ‘Desktop’ option. It tells Lightroom that you want to save the JPEG file to your computer’s desktop. You can probably guess that saving the converted JPEG image to your Desktop is not the only option in Export Module. Still, it is the simplest and fastest way of selecting Export Location without going into the rabbit hole of endless Lightroom options.
And to make it easier to locate the converted image on your Desktop, check the option ‘Put in Subfolder’ and give it a name, say ‘JPEG Export.’ The option tells Lightroom to automatically create the JPEG Export folder on your Desktop and sage the final JPEF image there.


5. Hit the Export Button
And finally, you press the Export button to initiate the RAW to JPEG conversion.


When you convert only one image, the conversion goes fast, almost instantaneously. But if you convert a large number of images, the conversion process can take a while.
As you probably notice, the Export Setting Window has a variety of export settings. Still, for the current tutorial, we used only a barebone of settings to convert RAW to JPEG.
If you are looking for a mo detailed information on Lightroom export settings, check the following tutorials:
How To Convert RAW to JPEG In Lightroom Using Presets
One of the main strengths of Lightroom is the power of presets. Lightroom has 9 types of presets: Develop Presets, Import Presets, Meta Data Presets, Copyright Presets, and so on. The Lightroom presets allows you to automate repeated tasks making an entire editing workflow fast and efficient.
It is not a surprise the Export Setting Window has preset functionality. Instead of fiddling with endless export settings every time you convert RAW to JPEG, you can save the desired configuration as a preset and reuse it every time you convert an image.
Let me show you how easily you can create an export preset in Lightroom.
Select the RAW image in the Library or Develop Module.
Right-click (option Click) on the selected image and choose the Export option from the menu.
From the Export Settings Window, select the following options:
- File Settings:
Image Format: JPEG
Color Space: sRGB
Quality: 100%
Keep the rest of the conversion options untouched.


When you finish with the conversion settings, it is time to save them as a preset.
At the bottom left corner of the Export Settings Window, locate the Add button and press it.
The New Preset menu will appear.
Give the name to your new preset, something like ‘JPEG 100%’, and select the ‘User Presets’ for the folder.
Finally, click the Create button.


New export preset ‘JPEG 100%’ under User Presets will be created.
Next time you need to convert the RAW file to a JPEG image, you can altogether bypass the Export Settings Window. You can trigger the RAW to JPEG conversion directly from the Library or Develop Modules.


How To Batch Convert RAW files to JPEG Images
In the first part of the tutorial, you learned how to manually convert the RAW file to JPEG in the Export Module of Lightroom.
In the second part, we covered how to automate the process of RAW to JPEG conversion by using the export preset.
And now, I want to show you how you can take the automation even further by combining export presets and batch conversion.
Butch conversion means converting multiple RAW files to JPEG images in one go.
Select multiple files in the Library or Develop Modules of Lightroom by holding does CTRL-key.
Right click on selected RAW files, choose the Export, and then Export preset ‘JPEG 100%’, which you created earlier.
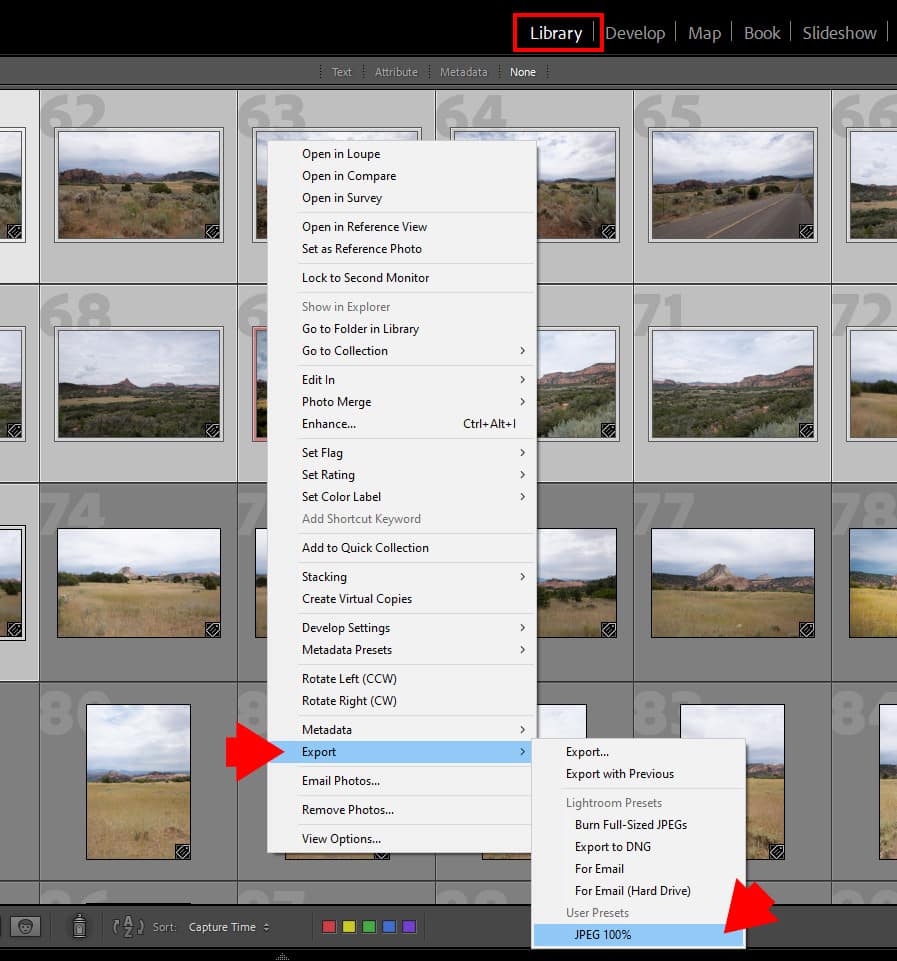

Now Lightroom takes all of the RAW files you selected and converts them to JPEG using export settings from the export preset.
This is the process I use when I need to convert multiple RAW files to JPEG images.
How To Convert RAW To JPEG: Final Thoughts
As you can see, Lightroom offers us a few ways to convert RAW files to JPEG. The fastest and most convenient way for the conversion is to use the export presets.
If you are subscribed to my mailing list, you can access the members’ area, where you can download free Export Presets I created for the PhotoTraces community.
If you lost the password to access the members’ area, go to the login page and click the Lost Your Password option to generate a new password.
If you are not a member of the PhotoTraces community, you can subscribe here: Free Lightroom Presets


