

[ad_1]
Histogram in pictures – a subject usually perceived as too complicated or pointless by many photographers. However let me let you know, they’re removed from it. When you study the way to learn histogram and the way to use it successfully, it turns into a useful software, like a secret weapon in your photographic arsenal.

This information is your key to unlocking the ability of histograms, the most essential software in your equipment for nailing publicity with each shot. I cannot solely educate you the way to perceive histograms but in addition present you sensible strategies for utilizing them in real-world pictures.
Moreover, I’ll present insights into how I exploit histograms, revealing my digital camera settings, to attain excellent publicity with each shot I take, and you are able to do the identical. So, be a part of me on this journey, and let’s demystify histograms and grasp the artwork of publicity.
What’s Publicity in Pictures?
Publicity in pictures refers back to the quantity of sunshine that reaches the digital camera’s picture sensor to create a picture. It’s a basic and demanding idea in pictures because it immediately impacts how brilliant or darkish a picture appears and impacts the general high quality and look of {a photograph}.
Let’s see how publicity is said to the histogram.
What’s a Histogram in Pictures?
In pictures, a histogram is a graphical illustration of the publicity ranges (brightness) inside a picture. It shows what number of pixels within the picture have a selected tonal worth, starting from pure black (shadows) on the left facet of the histogram to pure white (highlights) on the proper facet, with numerous shades of grey in between.
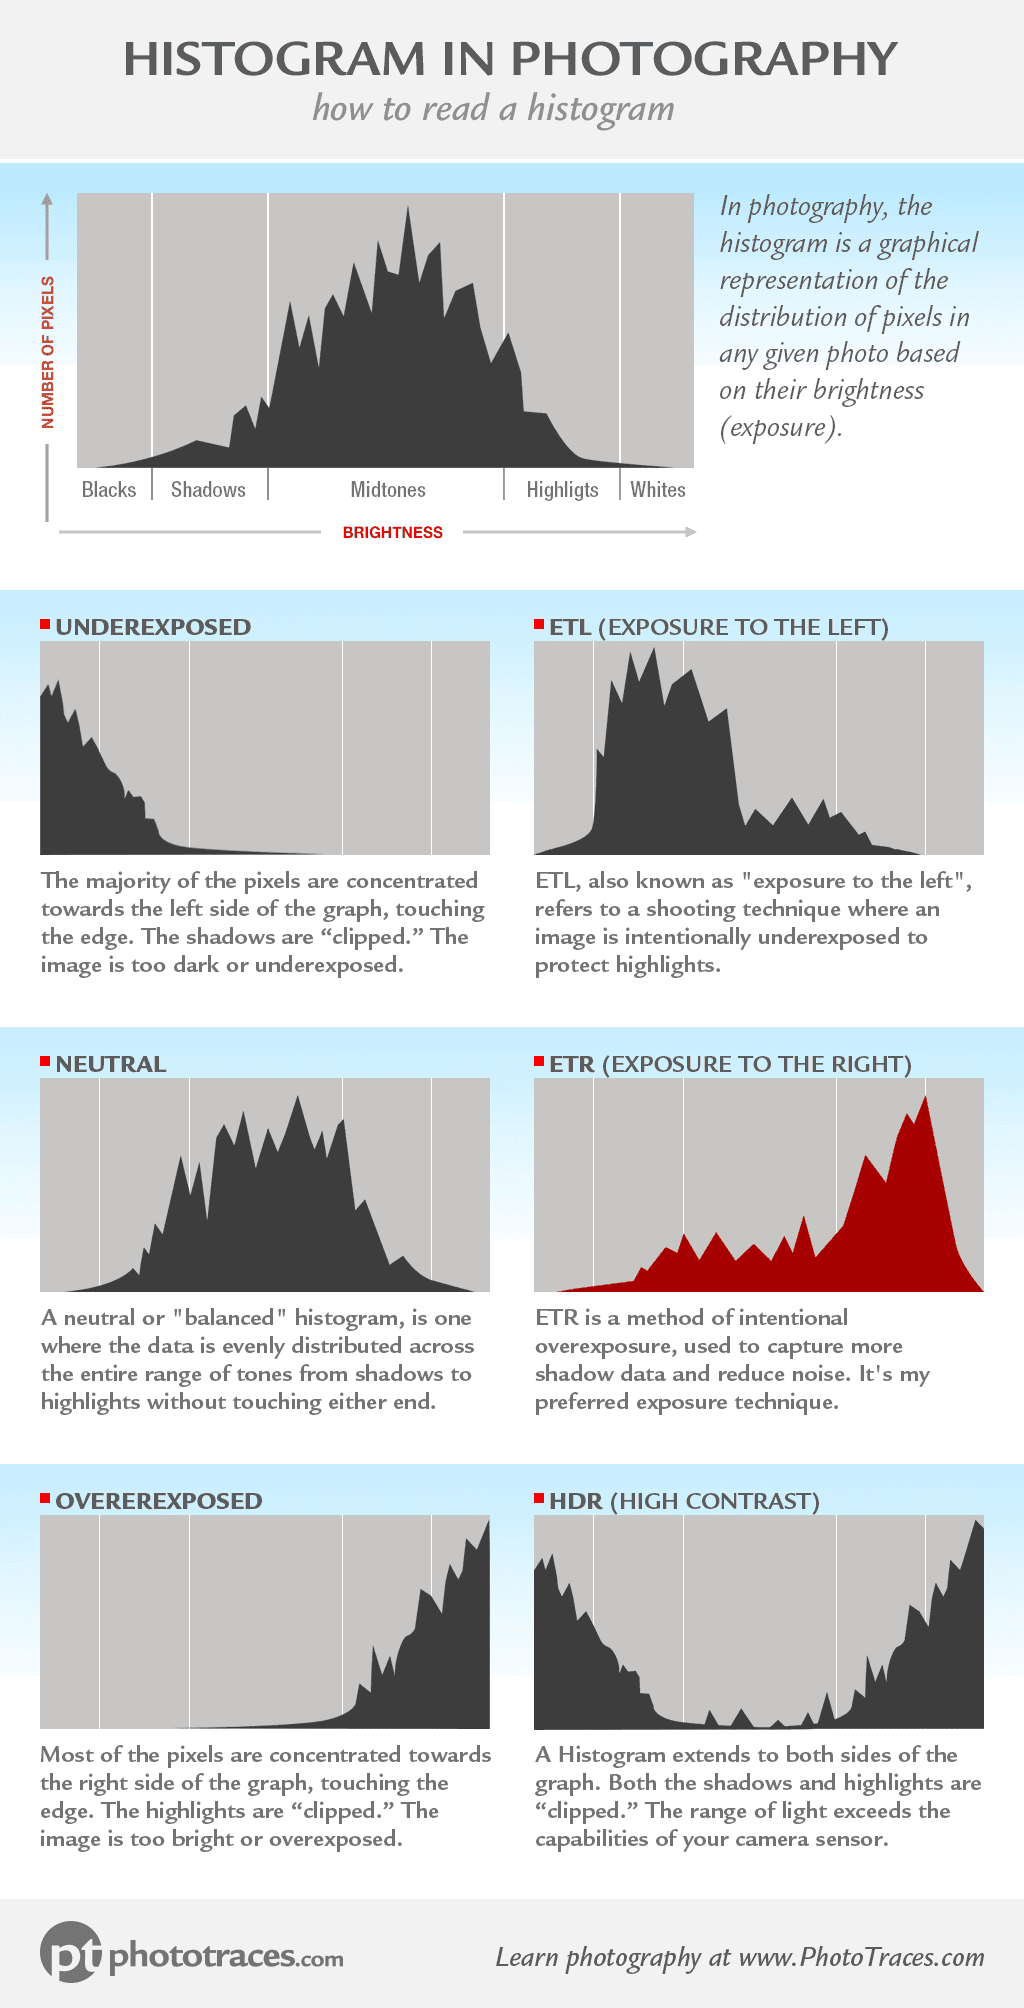
The horizontal axis represents the vary of tonal values, whereas the vertical axis reveals the variety of pixels with every tonal worth.
Shadows represented on the left facet of the histogram, point out the darker areas within the picture.
Highlights are proven on the proper facet of the histogram, they characterize the brighter areas within the picture.
Midtones Discovered in the course of the histogram, account for the tones which are neither very darkish not very brilliant.
As you may see, the histogram is a visible illustration indicating the brightness or darkness of varied areas of the picture from the digital camera sensor’s perspective. In a nutshell, the histogram is a visible illustration of the publicity.
The objective of the histogram is to offer photographers extra data to perform the duty of correctly exposing images.
Earlier than we transfer to sensible functions of histograms, let’s deal with some fundamentals.
What’s Histogram Clipping in pictures?
Histogram clipping in pictures refers to a scenario during which picture information falls exterior the dynamic vary of the digital camera sensor that may be precisely recorded or displayed. It usually happens at each ends of the histogram – within the highlights (proper facet) or shadows (left facet).
Clipping the Shadows (Underexposing)
Shadow clipping, often known as underexposure, happens when the histogram of a picture is touching the left facet of the graph. Because of this the darkest components of the picture have misplaced element and seem as stable black. When shadow clipping occurs, it signifies that the picture is underexposed, which implies that not sufficient gentle reaches the digital camera sensor to seize the total vary of shadow particulars.
Underexposure can result in a number of points in {a photograph}:
Lack of Element: The darkest areas of the picture, similar to shadows and low-light areas, lack element and seem as featureless black areas. This can lead to the lack of essential data and a scarcity of depth within the photograph.
Excessive Noise: Underexposed areas might exhibit elevated digital noise, making the picture seem extra distorted.
Decreased Dynamic Vary: The dynamic vary, which represents the vary of tones from shadows to highlights, turns into restricted.
Issue in Submit-Processing: Correcting underexposed pictures in post-processing may be difficult and even not possible. When clipped areas don’t comprise any data, they all the time keep black. You can’t get better one thing out of nothing.
Spotlight Clipping (Overexposure)
Spotlight clipping, often known as overexposure within the context of highlights, happens when the histogram of a picture touches the proper facet of the graph. Because of this the brightest components of the picture have misplaced element and seem as stable white or featureless blobs. When spotlight clipping occurs, it signifies that the picture is overexposed in its highlights, which means that an excessive amount of gentle reached the digital camera sensor, inflicting the brightest areas to lose element and be clipped.
Listed below are some key factors about spotlight clipping (underexposure in highlights):
Lack of Spotlight Element: The brightest areas of the picture, similar to overexposed skies or gentle sources, lack element and seem as stable white. This leads to the lack of essential data and may make the picture seem washed out.
Knowledge Restoration Is Inconceivable: Clipped highlights comprise no recoverable picture information. As soon as the highlights are clipped, the knowledge is misplaced, and it can’t be recovered in post-processing. For this reason it’s important to keep away from spotlight clipping.
Decreased Dynamic Vary: The general dynamic vary of the picture is diminished when spotlight clipping happens.
Easy methods to Learn a Histogram Graph
Underexposed Histogram
An underexposed histogram is a graphical illustration of picture information the place nearly all of the pixel values are concentrated in direction of the left facet of the graph, touching the sting, which signifies a scarcity of information within the shadow areas. Such a histogram means that the picture is simply too darkish or underexposed.

Histogram Uncovered to the Left
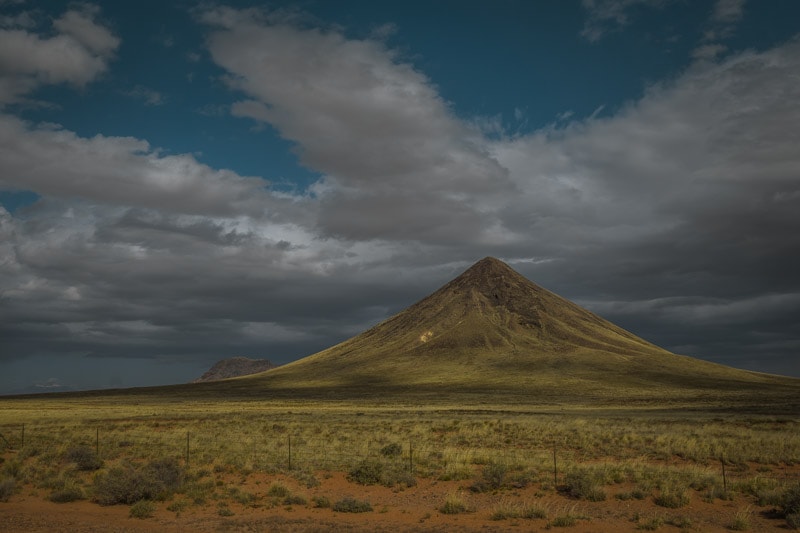
A histogram uncovered to the left, often known as “publicity to the left” (ETL), refers to a taking pictures approach the place an picture is deliberately underexposed. On this case, the photographer intentionally captures the picture with much less gentle, leading to darker shadows and well-preserved highlights.
ETL technique was extra frequent in movie pictures to keep away from extreme grain or lack of element within the spotlight areas, which may happen when overexposing the movie.

Impartial Histogram
A impartial histogram, generally known as a “balanced” or “even“, is one the place the info is evenly distributed throughout the whole vary of tones from shadows (left facet) to highlights (proper facet) with out touching both finish. In different phrases, it implies that there are not any “clipped” shadows or highlights, and nearly all of the info is concentrated within the midtones.
See additionally: Publicity Triangle
Histogram Uncovered to the Proper
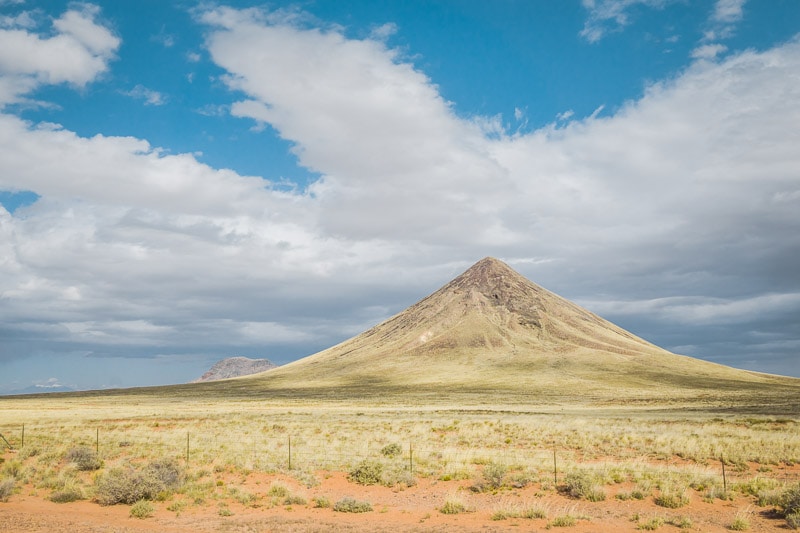
In pictures, an Publicity to the Proper (ETR) refers to a selected approach the place you deliberately push the publicity of a picture to the proper facet of the histogram with out really clipping the highlights. This method is usually used to maximise the quantity of information captured within the darker areas of the picture, notably within the shadows, and reduce its noise degree.


That is the approach I exploit most frequently in my pictures.
Overexposed Histogram
An overexposed histogram is one the place the info is skewed in direction of the proper facet and the histogram touches the proper facet of the graph It signifies that the picture incorporates areas the place the highlights are so brilliant that they’re “clipped.” Overexposed pictures endure from a lack of element within the brightest areas, making it not possible to get better data from these areas throughout post-processing.
HDR or Excessive Distinction Histogram
If you encounter a histogram that extends to either side of the graph, it’s an indicator of an excessive vary of sunshine scenario. On this context, each the shadows and highlights are “clipped”, signifying that the vary of sunshine you purpose to seize exceeds the capabilities of your digital camera sensor’s dynamic vary.
To deal with this problem, you’ll must make use of the Excessive Dynamic Vary (HDR) pictures approach. The basic idea entails taking a number of photographs of the identical scene at numerous publicity ranges. Later, throughout post-processing, you’ll merge these in another way uncovered pictures right into a single HDR picture.
HDR course of permits you to protect the entire dynamic vary of the scene, making certain that each the shadow and spotlight particulars are captured.


What Is the Good Histogram?
Sorry to disappoint you, however there’s no universally excellent histogram for all pictures. Nonetheless, there’s an optimum histogram that’s image-specific and may differ relying on the actual scene, topic, and the photographer’s fashion and artistic intent.
As an illustration, my most popular publicity approach is “Publicity to the Proper” (ETR). Because of this my optimum histogram for a panorama scene will likely be barely overexposed. Conversely, for a photographer utilizing the “Publicity to the Left” (ETL) approach, that very same scene can be barely underexposed, aligning with their taking pictures fashion and preferences.
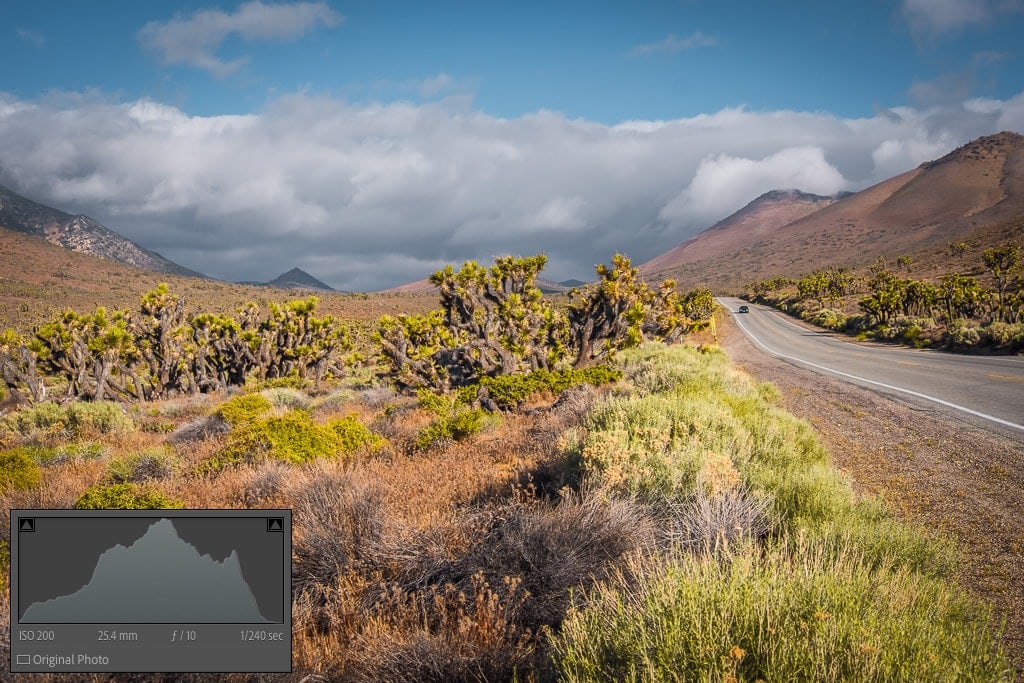
Let me give you an instance (see under). You possibly can seize the identical scene utilizing three totally different publicity strategies: Impartial, ETL, or ETR. Every of them can be utilized to create the ultimate photograph. Nonetheless, in my expertise, I’ve discovered that using the ETR (publicity to the proper) approach leads to the cleanest RAW file with minimal digital noise.


When to Use the Histogram On Digicam
My method is to all the time reap the benefits of the histogram performance, which has constantly helped me obtain practically 100% correct exposures.
With the developments in mirrorless cameras, you now not must seize a photograph earlier than accessing the histogram. You possibly can consider the publicity degree of the scene by inspecting the histogram earlier than taking the shot.
As we speak, there’s no purpose to not reap the benefits of the histogram.
Easy methods to Use the Histogram On Digicam
Permit me to show how I exploit histograms in my pictures.
Through the years, I’ve developed an publicity approach that isn’t solely efficient but in addition seamlessly integrates into my taking pictures and post-processing workflow. Two occasions have considerably contributed to its refinement.
First, I made the swap from Sony to Fujifilm. With my new Fujifilm XT2, I gained entry to superior histogram performance, a characteristic I hadn’t encountered with my earlier digital camera fashions. The newest firmware replace, accessible on the time, allowed me not solely to show the mixed histogram for the scene earlier than taking the shot but in addition separate histograms for every shade channel (RGB) on demand. In complete, I had entry to 4 variations of histograms, providing me unprecedented management over the publicity.
Second, whereas perusing technical publications, I stumbled upon a chunk of knowledge concerning digital sensors—one thing I wasn’t beforehand conscious of. It said that to maximise the efficiency of any digital picture sensor, it’s important to saturate it with gentle. Primarily, the upper the publicity for any given scene, the higher the standard of pictures it is going to produce.
That is when it clicked for me. I understood that the proper publicity approach is ETR (publicity to the proper) and the histogram perform is the primary software to manage it.
My digital camera settings:
Digicam Mode: Aperture Precedence
Metering Mode: Multi on Fujifilm (Evaluative Metering, Matrix, Multi-zone on different manufacturers)
Drive Mode: Single Shot
File Format: RAW (essential)
My publicity setting approach:
- I set the aperture to a worth between f/8 and f/13, relying on the scenario.
- I level the digital camera towards the scene I’m planning to {photograph}.
- I lock the publicity by urgent the AEL button.
- I activate the histogram inside EVF by urgent the entrance customizable button.
- I modify the Publicity Compensation worth with the assistance of the entrance command dial. Whereas altering the Publicity Compensation I exploit 4 energetic histograms inside EVF as a information. My objective is to increase publicity as excessive as attainable with out “clipping” the highlights.
- I press the shutter launch button when I’m executed with Publicity Compensation changes.
Right here’s why it’s essential to have particular person histograms for every shade channel. Whereas the mixed histogram would possibly recommend that highlights aren’t clipped, this may be deceptive, particularly when capturing landscapes with vast, clear blue skies. In such situations, the blue channel tends to get clipped first. To make sure an correct evaluation of spotlight integrity, it’s essential to guage particular person channels when making Publicity Compensation changes.
The results of such a way is barely overexposed images. The objective is to get the highest quality digital recordsdata in-camera. I deal with correct publicity later in post-processing in Lightroom. Provided that I constantly shoot in RAW format, there’s no high quality penalty related to this method.
Easy methods to Use the Histogram in Lightroom
The Histogram in Lightroom is simply as helpful as utilizing it in your digital camera. It acts as a dependable indicator to stop your photograph from being “overcooked” through the modifying course of.
To entry the histogram in Lightroom, navigate to the Develop Module. You’ll discover the Histogram Panel on the high proper nook of the interface. Click on on it to open the histogram.
With the Histogram Panel open, you may improve its performance by activating the “Present Shadow Clipping” and “Present Spotlight Clipping” options. To do that, merely click on on the 2 small triangles positioned within the high corners of the panel.
As soon as these options are activated, the histogram turns into an much more highly effective software. If you clip the shadows in your picture throughout modifying, the affected space will likely be highlighted in blue. Equally, should you clip the highlights, the clipped space will likely be indicated in pink.
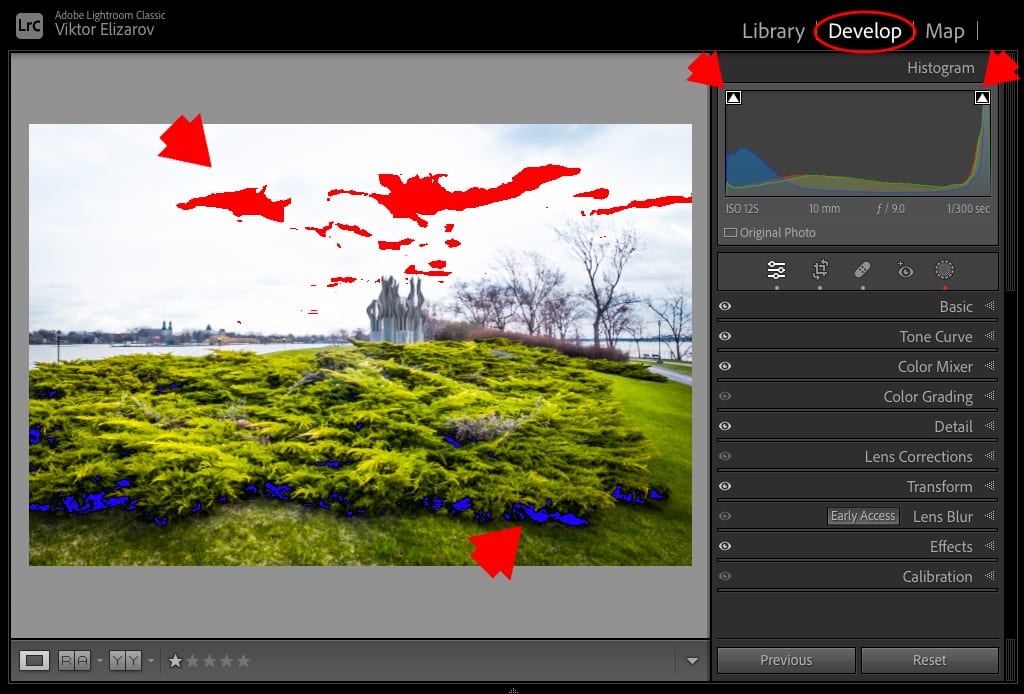
To benefit from this software, I beneficial preserving the Histogram Panel open always whilst you work in your photograph modifying. This fashion, you should utilize it as a dependable information to make sure your picture retains the proper tonal stability all through the modifying course of.
Utilizing the Histogram in Lightroom as an Interactive Device
The Histogram Panel in Lightroom serves a twin objective: it aids in publicity analysis and permits interactive modifying.
It’s divided into 5 areas, particularly Blacks, Shadows, Publicity, Highlights, and Whites. Adjusting these parameters visually is so simple as dragging them to the left or proper. This visible and interactive technique of performing primary changes streamlines the modifying course of.
For an in-depth exploration of Lightroom Histogram Modifying, together with a case research that highlights the effectivity and delight of unique modifying with the Histogram Panel, try my devoted article on the topic.
Easy methods to Get better Overexposed Pictures in Lightroom
You is perhaps questioning the way it’s attainable to salvage “clipped” spotlights once they seem to comprise no retrievable data. Because the saying goes, “you may’t get better one thing out of nothing.”
You’re right in noting that really clipped highlights can’t be recovered. Nonetheless, there’s a twist to this.
The Histogram in your digital camera and in Lightroom isn’t primarily based on RAW information. Each digital camera producers and Adobe take a little bit of a shortcut right here. They generate histograms primarily based on embedded JPEG preview pictures. Plainly creating histograms immediately from RAW information might be too processor-intensive, so that they make this compromise.
See additionally: JPEG vs RAW
The catch is that JPEGs are compressed pictures, and consequently, they’ve a narrower dynamic vary in comparison with RAW recordsdata. In sensible phrases, which means if you find yourself with a picture displaying “clipped highlights,” there’s a likelihood to get better the precise RAW information inside Lightroom.
Moreover, Lightroom incorporates a lesser-known perform of the Publicity slider. In addition to rising the picture’s brightness, it comes with a built-in restoration algorithm. When Lightroom detects that one of many three shade channels is “clipped,” it makes an attempt to reconstruct it utilizing information from the intact channels.
The success of this restoration course of may be variable; generally it really works, and generally it doesn’t. However you received’t know till you give it a strive.


For an in depth information on the way to get better overexposed pictures in Lightroom, try my devoted tutorial: Easy methods to Repair an Overexposed Photograph in Lightroom.
Histogram in Pictures & Easy methods to Learn a Histogram | Closing Ideas
Understanding and the way to use histograms in pictures isn’t just a technical endeavor; it’s an artwork type that permits you to grasp publicity. Histograms, usually neglected and misunderstood, are, the truth is, highly effective instruments that allow photographers to attain the right stability between shadows and highlights, leading to compelling and well-exposed pictures.
What to Learn Subsequent:
[ad_2]