

Matching a number of vendor payments to a single buy order is a typical job in lots of AP processes, so it is best to know deal with this case in NetSuite. The excellent news is that Oracle has a bunch of choices that can assist you streamline this course of – you need to use the NetSuite UI, the API, or SuiteScript.
On this information, we’ll discover hyperlink a single buy order to a number of vendor payments, utilizing every of those strategies. We’ll additionally focus on the constraints and advantages of utilizing the APIs.
It is necessary to notice that the complexity of the NetSuite API may be overwhelming. It takes a variety of devoted time (and energy) to arrange an API integration and truly automate your NetSuite workflows.
That is the place Nanonets is available in, offering a plug-and-play integration with NetSuite that eliminates the effort and confusion, making PO matching automation easy.
Nanonets automates vendor invoice entry into NetSuite, and units up seamless 2-way and 3-way PO matching in lower than quarter-hour!
However earlier than we get too far forward of ourselves, let’s first perceive match a number of vendor payments to a PO with ease.
Matching a PO to A number of Vendor Payments on the NetSuite UI
Utilizing the NetSuite UI to match a single buy order (PO) to a number of vendor payments is a simple job, excellent for smaller operations or companies that do not want automation. This methodology permits you to create payments for various line gadgets on a PO or for partial portions of things.
Step-by-Step Directions:
- Entry the Buy Order:
- Navigate to Transactions > Purchases > Enter Buy Orders to find the PO you need to match.
- Invoice the Buy Order:
- Click on on Invoice on the highest header row of the Buy Order.
- Edit the Invoice Line Particulars:
- By default all of the strains of the PO will likely be added to the seller invoice. You may take away the strains that aren’t required, in order that the PO is barely partially billed for the required line gadgets.
- In case you’ll want to partially invoice any line (for eg, if you have not obtained all the amount for that merchandise) – you possibly can edit the amount billed at this stage.
- Repeat for Further Vendor Payments:
- If the PO requires a number of payments, repeat the method, choosing the remaining gadgets or portions on the PO.
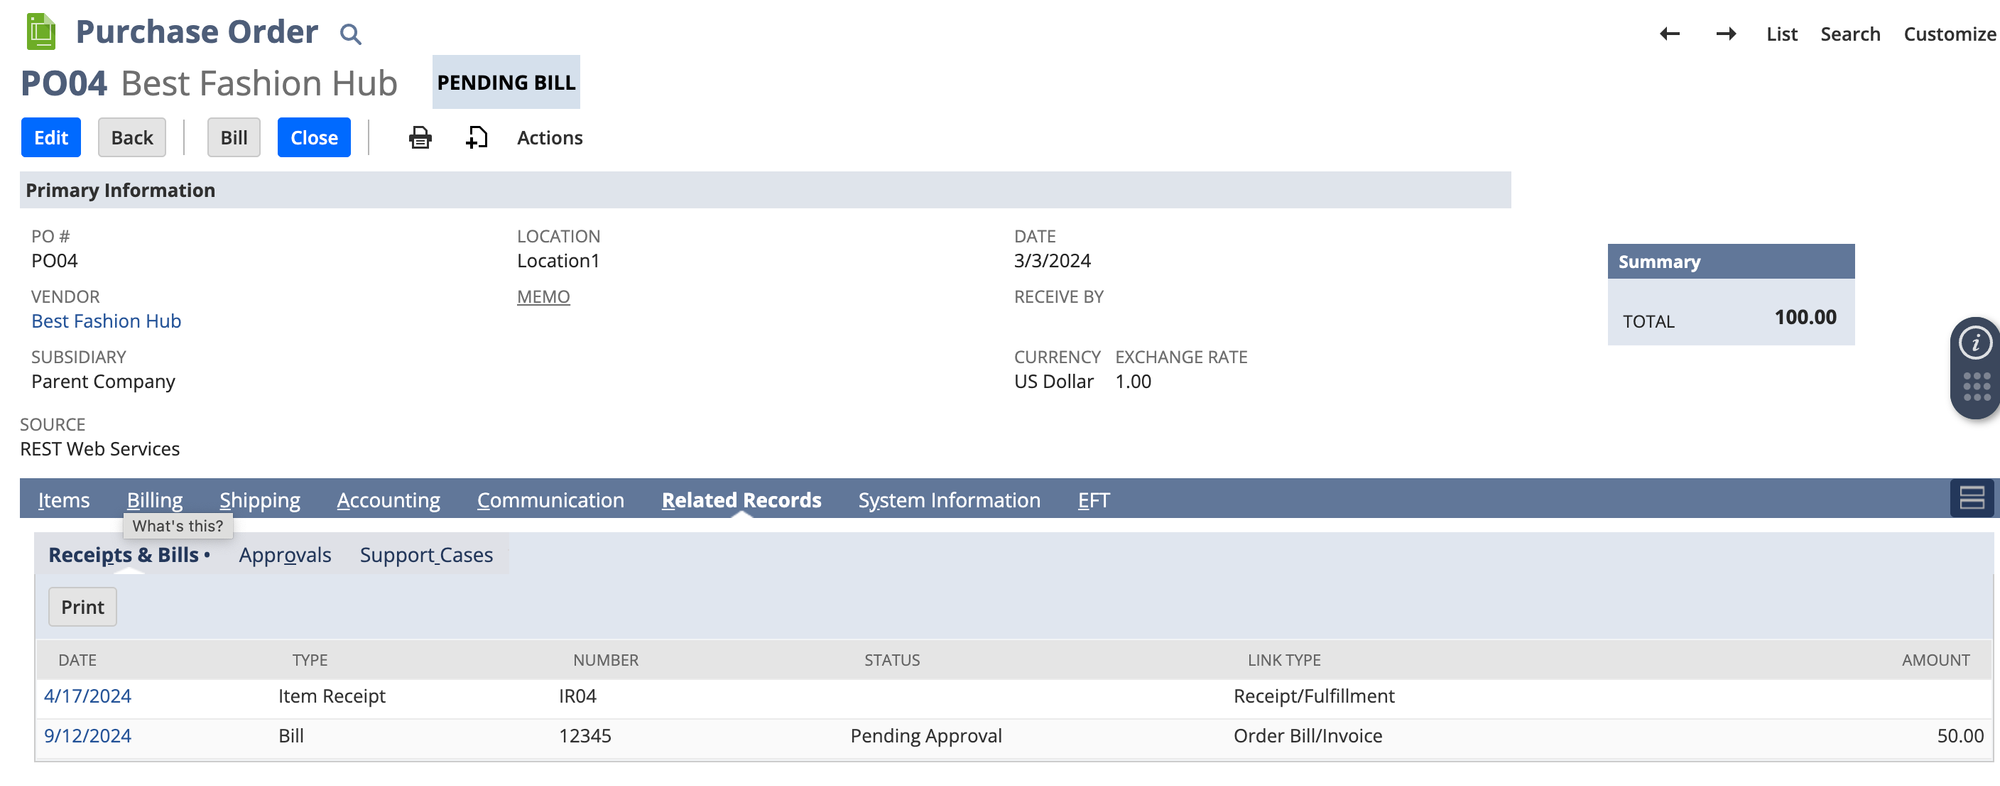
Observe that the created vendor payments will NOT present up within the “Billing” subtab on the acquisition order. They are going to be seen in associated information solely. It is because NetSuite solely does a 1-time replace utilizing their ‘Rework’ perform to transform a PO right into a vendor invoice.
Matching a PO to A number of Vendor Payments Utilizing the API
NetSuite offers each SOAP and REST APIs (these are 2 totally different API applied sciences which are generally utilized by builders). Whereas the SOAP API is older and extra mature, it will also be gradual in efficiency. The NetSuite REST API is extra trendy (it was launched in 2019 by Oracle) however would not have the in depth help and customisation capabilities that the SOAP API has.
💡
For this text, we’ll use the instance of the SOAP API to do the PO matching with Vendor Payments.
There are 2 approaches you possibly can take to hyperlink a purchase order order to a vendor invoice:
- Use the purchaseOrderList tag to reference a PO when creating the seller invoice – doing it will pull in ALL of the gadgets and bills current on that PO
- Use an Initialize request and choose merchandise and expense strains from present POs – doing this has the benefit of with the ability to choose particular strains from the PO. It’s also possible to use this to handle the use case of a number of POs in a single vendor invoice.
Step-by-Step Directions:
- Retrieve the Buy Order File:
Retrieve the main points of the acquisition order utilizing the get operation. This offers entry to the PO’s line gadgets, portions, and remaining portions.
Payload:
<get>
    <baseRef internalId="PO_ID" kind="purchaseOrder"/>
</get>- Create Vendor Invoice for First Invoice:
As we noticed above, in case you use method 1 – use the add operation to create a vendor invoice for the primary set of line gadgets or portions from the PO.
Payload:
<add xmlns="urn:messages_2017_1.platform.webservices.netsuite.com">
            <file xsi:kind="ns6:VendorBill" xmlns:ns6="urn:purchases_2017_1.transactions.webservices.netsuite.com">
               <ns6:entity internalId="98" xsi:kind="ns7:RecordRef" xmlns:ns7="urn:core_2017_1.platform.webservices.netsuite.com"/>
               <ns6:purchaseOrderList xsi:kind="ns8:RecordRefList" xmlns:ns8="urn:core_2017_1.platform.webservices.netsuite.com">
                  <ns8:recordRef internalId="2659" kind="purchaseOrder" xsi:kind="ns8:RecordRef"/>
                  <ns8:recordRef internalId="2661" kind="purchaseOrder" xsi:kind="ns8:RecordRef"/>
               </ns6:purchaseOrderList>
            </file>
  </add>
For those who’re utilizing method 2, the payload will likely be:
<initialize xmlns="urn:messages_2017_1.platform.webservices.netsuite.com">
            <initializeRecord>
               <ns7:kind xmlns:ns7="urn:core_2017_1.platform.webservices.netsuite.com">vendorBill</ns7:kind>
               <ns8:referenceList xmlns:ns8="urn:core_2017_1.platform.webservices.netsuite.com">
                  <ns8:initializeRef internalId="2659" kind="purchaseOrder"/>
                  <ns8:initializeRef internalId="2661" kind="purchaseOrder"/>
               </ns8:referenceList>
            </initializeRecord>
</initialize>
3. Repeat for Further Vendor Payments:
- Repeat the method so as to add extra payments, adjusting the road gadgets and portions for every vendor invoice.
SOAP API vs REST API: Key Variations
We’ll go into somewhat extra element since that is one thing that always comes up in NetSuite improvement – what’s the distinction, actually, between these two varieties of APIs given by Oracle?
SOAP API:
- Authentication: SOAP makes use of Token-Primarily based Authentication (TBA), which is OAuth1-based. Although older, it’s well-supported in enterprise settings and comparatively simple to configure.
- Metadata Dealing with: SOAP handles normal entities and fields properly however struggles with customized fields with out extra workarounds.
- Saved Searches and File Cupboard: SOAP offers built-in help for saved searches and file cupboard operations, making it the popular selection for complicated information retrieval duties.
- Efficiency: SOAP is gradual (however steady) and excellent for giant, complicated integrations, although the syntax is extra verbose and difficult in comparison with REST.
💡
1. For those who’re doing large-scale or complicated integrations that can virtually actually contain non-standard operations, file motion and so forth
2. For any self-serve deployments (for the reason that documentation is in depth, and there’s a historical past of profitable integrations performed by others)
REST API:
- Authentication Flexibility: REST helps OAuth2 along with TBA. Nevertheless, OAuth2 in NetSuite has some caveats, resembling frequent token expirations for the Authorization Code Grant methodology.
- Metadata Dealing with: REST permits for extra dynamic entry to metadata, making it helpful for environments the place entity constructions change regularly. REST additionally helps OpenAPI schemas, together with for customized fields.
- SuiteQL Help: REST consists of help for SuiteQL, which may considerably simplify complicated queries by permitting SQL-like queries through the API.
- Limitations: REST continues to be comparatively new in NetSuite, and lots of information are nonetheless in beta. Important features like saved searches and file cupboard entry require workarounds, resembling customized Restlets.
💡
1. For quicker and small-scale deployments, the place you might be principally working with normal objects (like buyer, salesOrder, bill and so forth).
2. For circumstances the place OAuth2 is remitted by the consumer’s authentication necessities
Matching a PO to Vendor Payments Utilizing SuiteScript
For corporations that require a extremely custom-made resolution, SuiteScript offers a strong JavaScript-based scripting platform to match buy orders with a number of vendor payments. SuiteScript permits full management over workflows and is extra helpful in circumstances the place customization is necessary.
Step-by-Step Directions:
- Load the Buy Order:
var poRecord = file.load({
    kind: file.Sort.PURCHASE_ORDER,
    id: 'PO_ID'
});
Use SuiteScript’s file.load methodology to entry the acquisition order.
2. Create the Vendor Invoice:
outline(['N/record', 'N/search'], perform(file, search) {

  perform createVendorBillFromPO(poId) {
    strive {
      // Load the Buy Order file
      var purchaseOrder = file.load({
        kind: file.Sort.PURCHASE_ORDER,
        id: poId
      });

      // Create a brand new Vendor Invoice
      var vendorBill = file.create({
        kind: file.Sort.VENDOR_BILL,
        isDynamic: true
      });

      // Set the Vendor and different primary particulars from the PO
      vendorBill.setValue({
        fieldId: 'entity',
        worth: purchaseOrder.getValue('entity')  // Vendor from PO
      });

      // Copy over another header-level fields from the PO if crucial
      // (e.g. phrases, subsidiary, and so on.)
      vendorBill.setValue({
        fieldId: 'phrases',
        worth: purchaseOrder.getValue('phrases')
      });

      // Add PO line gadgets to the Vendor Invoice
      var lineCount = purchaseOrder.getLineCount({ sublistId: 'merchandise' });
      for (var i = 0; i < lineCount; i++) {
        var orderdoc = purchaseOrder.getSublistValue({
          sublistId: 'merchandise',
          fieldId: 'orderdoc',
          line: i
        });
        var orderline = purchaseOrder.getSublistValue({
          sublistId: 'merchandise',
          fieldId: 'orderline',
          line: i
        });

        // Choose the present line within the Vendor Invoice
        vendorBill.selectNewLine({ sublistId: 'merchandise' });

        // Set the mandatory fields (orderdoc and orderline are necessary for matching)
        vendorBill.setCurrentSublistValue({
          sublistId: 'merchandise',
          fieldId: 'orderdoc',
          worth: orderdoc  // PO Inner ID
        });
        vendorBill.setCurrentSublistValue({
          sublistId: 'merchandise',
          fieldId: 'orderline',
          worth: orderline  // PO line quantity
        });

        // Set the merchandise, amount, and charge (copying from PO)
        vendorBill.setCurrentSublistValue({
          sublistId: 'merchandise',
          fieldId: 'merchandise',
          worth: purchaseOrder.getSublistValue({
            sublistId: 'merchandise',
            fieldId: 'merchandise',
            line: i
          })
        });

        vendorBill.setCurrentSublistValue({
          sublistId: 'merchandise',
          fieldId: 'amount',
          worth: purchaseOrder.getSublistValue({
            sublistId: 'merchandise',
            fieldId: 'amount',
            line: i
          })
        });

        vendorBill.setCurrentSublistValue({
          sublistId: 'merchandise',
          fieldId: 'charge',
          worth: purchaseOrder.getSublistValue({
            sublistId: 'merchandise',
            fieldId: 'charge',
            line: i
          })
        });

        // Commit the road to the Vendor Invoice
        vendorBill.commitLine({ sublistId: 'merchandise' });
      }

      // Save the Vendor Invoice
      var vendorBillId = vendorBill.save();
      log.debug('Vendor Invoice created', 'Vendor Invoice ID: ' + vendorBillId);

      return vendorBillId;

    } catch (e) {
      log.error('Error creating Vendor Invoice', e);
      throw e;
    }
  }

  return {
    createVendorBillFromPO: createVendorBillFromPO
  };

});
Create a vendor invoice file utilizing file.create. The above code copies over all of the strains from the PO to the seller invoice – if wanted, you possibly can choose the suitable line gadgets from the PO and map them to the seller invoice. This lets you match every PO line merchandise to the seller invoice line merchandise.
3. Repeat for A number of Payments:
Use this logic to create extra vendor payments by choosing remaining PO strains in subsequent script executions.
Benefits of SuiteScript:
- Full Customization: SuiteScript provides whole management over the method, making it good for distinctive billing workflows.
- Extensibility: You may simply construct on the script to deal with different customized wants like validation, logging, or error dealing with.
Frequent Errors and Troubleshooting
- The PO is absolutely billed and obtained, however nonetheless reveals Pending Invoice
- That is doubtless as a result of the seller invoice has been created as a standalone invoice (i.e., a invoice not linked to a PO). You may confirm this by checking the Associated Information sub-tab on the invoice for the PO hyperlink (or test the journal entry – a standalone invoice will likely be tagged to Stock, whereas a PO-linked invoice will likely be tagged to Accruals).
- I need to hyperlink a vendor invoice the place obtained amount is greater than the unique PO
- On this case, it is often finest to finish the receiving and billing, preserving that data as correct as attainable, after which working PVBV (Put up Vendor Invoice Variances) on the PO strains to search out and regulate the errors to Accrued Purchases and your GL.
- I need to match a number of POs to a single invoice
- In some circumstances you may need to match multiple PO to a single vendor invoice (if, for instance, you obtained a mixed bill for a lot of POs on the identical vendor). This may be addressed utilizing the SOAP API as described above, utilizing the Initialize methodology.
Utilizing end-to-end Workflow Automation for PO Matching
For those who’re utilizing NetSuite to run your funds and CRM operations, it is fairly doubtless you are already working a manufacturing deployment of NetSuite, and all of your workflows are arrange and getting used every day.
In such a situation, it could be simpler to work with an integration accomplice who can migrate your processes and automate a manufacturing surroundings, with out you having to get into the messy particulars of API integrations and SuiteQL queries.
💡
– Greater than 80% time financial savings on PO matching
– Inbuilt information validation and formatting for NetSuite
– Excessive accuracy, trainable AI
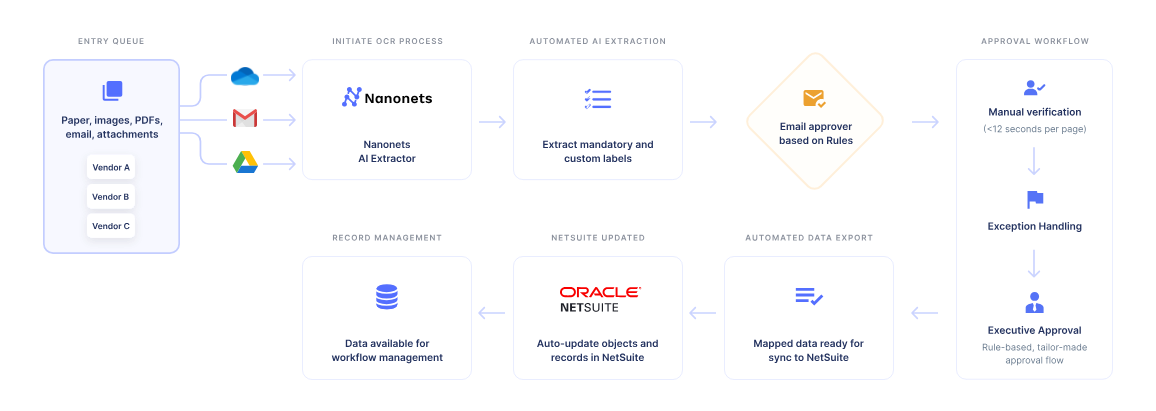
That is what full-scale NetSuite automation on Nanonets seems to be like:
Desirous about studying extra? A brief 15-minute intro name with an automation skilled is one of the best ways to get began.
Conclusion
Matching a purchase order order to a number of vendor payments in NetSuite may be dealt with in a number of methods, relying on your online business setup. You may go for one thing that’s extra guide and provides you extra management, or you possibly can absolutely automate it utilizing the API (with considerably greater effort and a few coding concerned).
By combining the very best of each worlds utilizing a no-code resolution like Nanonets, you possibly can confidently handle vendor merchandise codes, streamline information entry, and scale back guide errors, saving worthwhile time to your procurement and finance groups.
References: